Building a 6.5-06 rifle, and making mistakes

Clark

New member
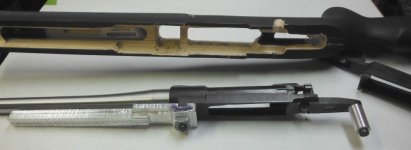
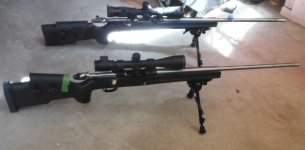
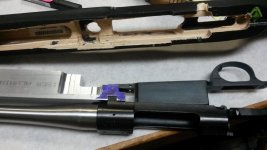
This 6.5-06 rifle has a Dumoulin Mauser receiver and a Shilen select match #3 taper 8" twist ratchet rifling barrel.
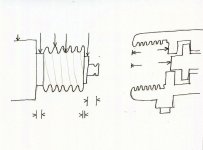
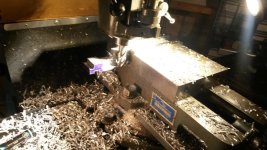
I wrap a piece of copper wire around the breech, put that in the chuck and call it a gimbal. Then I dial in the breech. Then with the spider I steer the barrel to be parallel with the lathe spindle. Then I dial in the breech again. This goes on until the spud in the bore looks dialed in over a length.
i cut an inch off the breech.
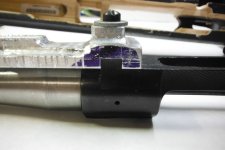
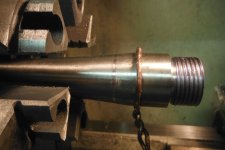
My barrel kept slipping in the chuck. I hate that. It is a real pain to pick up the half cut threads and continue.
OK, I found out why I was slipping. Can you see where it polished the barrel with slippage?
Mistake #1
The gimbal wire was on the tapered part of the barrel and it was sliding down the taper like socks slipping down your ankle.
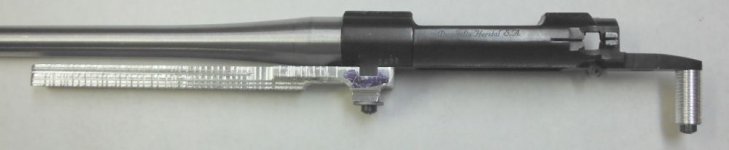
The fix:
I got the gimbal [garter] way up on the shank [leg calf] and now it does not slip [as often].
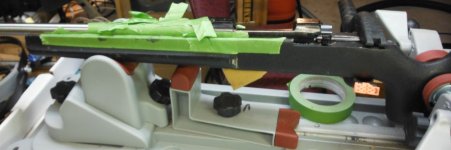
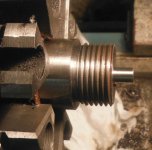
I finished the threads.
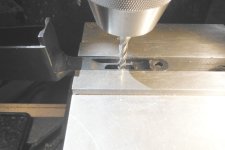
I started reaming the chamber.
How do I do it?
At 200 r.p.m. I drill a 0.375" hole, 1/2 inch deep in the bore with stinky Sulfurized cutting oil on the drill..
I vacuum out the the chips from the bore
Then with a boring bar at 200 r.p.m. I open the hole to 0.400", again 1/2" deep.
I would be going 1200 r.p.m for those two operations, but I don't trust that slippery gimbal.
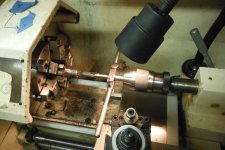
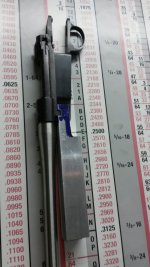
Then with the pilot tipped 6.5-06 finish reamer at 65 r.p.m. I ream the hole to 0.430" to 0.1" deep
The reamer is in a tap holder. It is riding on the boring bar. I lift it off of there with my finger every few seconds to feel the torque. My finger is high compliance and could induce chatter. The boring bar is stiff, but can't feel torque. Knowing the torque, I turn the wheel on the tailstock that advances the ram. The chuck in the ram has a big pin gauge that pushes on the tap holder.
The reamer fills up with chips, so I could only go 0.1" deep.
I vacuum the chips off the reamer and out of the bore. I rub more cutting on on the reamer with a toothbrush.
Then I put it back in the bore at 65 rpm.
This repeats until I get 1/2" deep.
Then it is time for the drill at 200 rpm to go 1" deep.
Do you get the pattern?
This must end, as the cartridge is only 2" deep at the shoulder.
Exactly when to stop?
Mistake #2
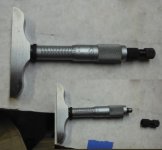
I forgot to buy a go gauge.
Two day shipping cost more than the gauge. I hate paying extra for fast shipping.
I will use a piece of virgin 25-06 brass as a go gauge for two days.
 

Attachments

  • Gimbal wire slipping on barrel taper 6.5-06 7-19-2015.jpg
    Gimbal wire slipping on barrel taper 6.5-06 7-19-2015.jpg
    73.3 KB · Views: 46
  • Gimbal wire positioned off the barrel taper 6.5-06 7-19-2015.jpg
    Gimbal wire positioned off the barrel taper 6.5-06 7-19-2015.jpg
    121 KB · Views: 43
  • Chambering 6.5-06 7-20-2015.jpg
    Chambering 6.5-06 7-20-2015.jpg
    103.6 KB · Views: 44
I don't really see any mistakes there, although I never tried wire. I usually just use a split brass ring or brass shim stock. I rarely ever used HS gages, unless it was to check a rifle already together. I would resize brass and use that. What are the chances of stopping within a couple tenths when you add in compression during installation? If anything, the chamber is usually tighter when using resized brass to check.
Do you cut threads with copper wire? I only use one side of the thread tool to cut, and that puts a lot of pressure on the work piece. I may have to try that sometime. I am starting to get the bug again and may pick up a small lathe.
 
Yes, I cut threads with the Copper wire. I am not obsessive about threads, but I am about the shoulder and the breech being square.
I went though all of this 13 years ago.. it is coming back to me.
The Lothar Walther barrels had mirror finishes on them. They slipped. We rubbed rough sandpaper on the shanks and it fixed the problem.
 
I start with measuring the receiver, everything that protrudes from the barrel protrudes into the receiver. There is no way I would chamber a barrel with a gage without knowing the distance from the front receiver ring to the bolt face or the distance from the 'C' ring to the bolt face.

F. Guffey
 
I've never though about using copper wire like that. I have four pieces of aluminum flat stock, about 0.10" thick, that I place under each jaw for soft jaws. In your case, that would be six.:D

I have made full soft jaws, both bronze and aluminum, that once milled, you mount on the chuck, then bore them so they are concentric with the spindle on a self-centering chuck.
 
More mistakes...
I used a Starrett depth micrometer to measure how far a new piece of 25-06 brass sticks out of the chamber I was cutting. I was turning the shiny part of the knurled handle when I should have been turning the black. The black backed out and gave a reading that was 0.007" too big. I was going to set the headspace at 0.002" under until my 2nd day delivery go gauge arrives.

So I am now halfway, in the middle of the SAAMI headspace range of 0.010" for 25-06, 270, and 30-06.
I wanted to be right at the bottom so I could use 270 case gauge for reloading reference.

I give up on that. I am not going to try to shorten the shoulder and breech. I pulled out the barrel, cut an inch off the muzzle, and crowned it at 11 degrees with a 0 degree rim for attaching the Leopold magnetic zero point.

What does it all mean?
Screw on the little black knob on the Starrett and listen to it click.

attachment.php

attachment.php

I can see the ratchet rifling
pics above same as links below
 

Attachments

  • Starrett depth michrometer with clutch knob backed off 7-21-2015.jpg
    Starrett depth michrometer with clutch knob backed off 7-21-2015.jpg
    84.2 KB · Views: 234
  • 6.5-06 Crown 7-21-2015.jpg
    6.5-06 Crown 7-21-2015.jpg
    82.5 KB · Views: 233
I wanted to be right at the bottom so I could use 270 case gauge for reloading reference.

The 270 W case gage is .041" longer than the 6.5/06 gage, I would use the 30/06 case gage.

So I am now halfway, in the middle of the SAAMI headspace range of 0.010" for 25-06, 270, and 30-06.
I wanted to be right at the bottom so I could use 270 case gauge for reloading reference.

The case gage is a datum based tool. If my chamber is at the midpoint of .010" I would be at .005" longer than a minimum length case, in the perfect world my case would be level with the top of the case gage.

F. Guffey
 
Here is the Mauser barreling form I made for myself to print out and fill in the blanks and tape to the lathe.
 

Attachments

  • Mauserblankdrawingforrebarrel1.jpg
    Mauserblankdrawingforrebarrel1.jpg
    64 KB · Views: 22
Reminds me of the instructions that came with finished barrels by Douglas. It was a 'fill in the blank' drawing. My favorite was a short chambered barrel.

F. Guffey
 
So i cut come tubes. 3/8" outside diameter 1.06" long 0.03" thick walls for the rear pillar.
5/8" OD 0.062" wall, 0.603" long for the front pillar.
I get those to fit with a 0.014" gap between receiver and magazine well.

So far so good, but then I leave the beaten path of accredited procedure.

Then I start making a combination front pillar / recoil lug.... my Frankenstein.
It will be 0.603" thick where it separates the receiver from the bottom metal. Together they clamp the stock in between.
I take block of Aluminum alloy and start cutting it.
The goal is to have things so stiff that they act as one mass before the bullet escapes. That is so stiff it rings like a bell.... actually like a tuning fork. An exponentially decaying sinusoid with low losses and high pitch.
 

Attachments

  • 6.5-06 recoil lug - front pillar fabricaion 7-24-2015.jpg
    6.5-06 recoil lug - front pillar fabricaion 7-24-2015.jpg
    76.5 KB · Views: 18
  • 6.5-06 recoil lug - front pillar fabricaion b 7-24-2015.jpg
    6.5-06 recoil lug - front pillar fabricaion b 7-24-2015.jpg
    120.6 KB · Views: 18
  • 6.5-06 recoil lug - front pillar fabricaion c 7-24-2015.jpg
    6.5-06 recoil lug - front pillar fabricaion c 7-24-2015.jpg
    89.2 KB · Views: 26
I bid on and won an auction, it was claimed to the ugliest sporter ever built by reloading forms that were viewing the auction. I won, $120.00. I purchased the rifle for parts and on the outside chance the builder could not build a rifle that ugly without knowing what he was doing.

I loaded 12 different loads using 12 different head stamps with different powder and bullets, 120 rounds total to test the rifle. After test firing I decided there was nothing I could do nothing to improve on the accuracy so I applied the leaver policy.

The receiver, stock and barrel was one solid piece above and below and on both sides of the barrel. The groups moved, there were no flyers and some of the groups shared the same hole. The rifle got hot so I took all day.

I have more invested in the scope mounts, rings and scope than I have in the rifle.

F. Guffey
 
More mistakes

I finished the 6.5-06 wildcat front pillar/recoil lug Aluminum alloy machining and inletting the stock to fit it..
That took days. The stock and the long pillar took turns in the mill.

I finished the rear pillar.
That took 4 attempts:
1) 3/8" tubing 1.160" long for fitting and finding correct length for correct magazine to receiver gap.
2) 3/4" solid alloy turned down to 5/8", double pitch buttressing treads for traction in epoxy. Two annular contacts to receiver, 5/8" and 3/8" countersett by 0.115". Forgot to make it longer for counter sink. Start over. What a disappointment:( I next tried to see how fast I could make another one.
3) Made another, but 1.060" + countersink, crashed the lathe. I do the 1/4" pilot at 1200 rpm and the threads at 65 rpm with the lead screw turning and engauged. I turned on the lathe at 1200 rpm with the lead screw engaged and the cutting tool hit the chuck before I could stop it. Destroyed my only find grain fixed carbide lathe tool. I made it in 28 minutes, but I wish I had taken it slower.
4) Made another one with a replaceable carbide tool from China.

I order Devcon plastic steel by mistake. So I used up the last of the my Devcon Steel Putty.
The rear pillar hole is 5/8" and so is the rear pillar. I did not epoxy them together yet. they are so close they made a good positioning for the front pillar/recoil lug..
It is all gooped together now, could be great, could be I have to break the stock to get it off. I will know in the morning.
 

Attachments

  • 6.5-06 recoil lug - front and rear pillar c 7-27-2015.jpg
    6.5-06 recoil lug - front and rear pillar c 7-27-2015.jpg
    45.3 KB · Views: 18
  • 6.5-06 recoil lug - front pillar  7-27-2015.jpg
    6.5-06 recoil lug - front pillar 7-27-2015.jpg
    69.9 KB · Views: 17
  • 6.5-06 glass bedding front end 7-27-2015.jpg
    6.5-06 glass bedding front end 7-27-2015.jpg
    50.3 KB · Views: 20
How much space is between aluminium bedding block and barrel?
What do you like about the "Steel Putty" over the "Plastic Steel"?
 
Lots of space for other 98 actions with bull barrels to fit.

I like the putty so I do not have to fight gravity.

The front pillar/recoil pin / sling and bipod drill and tap / was done with putty.

The rear pillar was 5/8" in a 5/8" hole with foam rubber as a dam. I got away with plastic steel in there last night.
 

Attachments

  • 6.5-06 recoil lug - front and rear pillar g 7-27-2015.jpg
    6.5-06 recoil lug - front and rear pillar g 7-27-2015.jpg
    25.7 KB · Views: 15
  • 6.5-06 recoil lug - front pillar with putty rear with plastic 7-29-2015.jpg
    6.5-06 recoil lug - front pillar with putty rear with plastic 7-29-2015.jpg
    64.7 KB · Views: 13
Last edited:
It may be ready for the range. I have yet to load some ammo.
The 6mmRem Douglas USO 1903 Turk Mauser is range ready [in the background], but I have loaded ammo for it already.

I had a long list of things to do to the 6.5-06 today to get it ready, but had not planned on relieving the Dumoulin trigger guard to fit the Dumoulin trigger.
Get a stock in the way and the action will not assemble...
Sheesh!
 

Attachments

  • 6.5-06 and 6mmRem ready to shoot 7-29-2015.jpg
    6.5-06 and 6mmRem ready to shoot 7-29-2015.jpg
    54.5 KB · Views: 23
  • Dumoulin Mauser can't fit in it's own trigger hole 7-29-2015.jpg
    Dumoulin Mauser can't fit in it's own trigger hole 7-29-2015.jpg
    70.3 KB · Views: 18
Back
Top