You are using an out of date browser. It may not display this or other websites correctly.
You should upgrade or use an alternative browser.
You should upgrade or use an alternative browser.
Bolt action rifle pillars
- Thread starter GURU1911
- Start date
I have used the 3/8 steel, the 3/8 stainless, and the 3/8 brass tubing.
I am giving up on brass because of dissimilar metals.
I am giving up on stainless because of work hardening when machining.
I am now just using the 3/8" steel tubing.
You may want to turn the heads on some action screws down to 3/8".
Pre compress the pillar when epoxied into the stock with the receiver, but not the bottom metal.
http://www272.pair.com/stevewag/turk/turkbed1.html
http://www272.pair.com/stevewag/turk/turkbed2.html
http://www272.pair.com/stevewag/turk/turkbed3.html
Mr.slamfire: Question
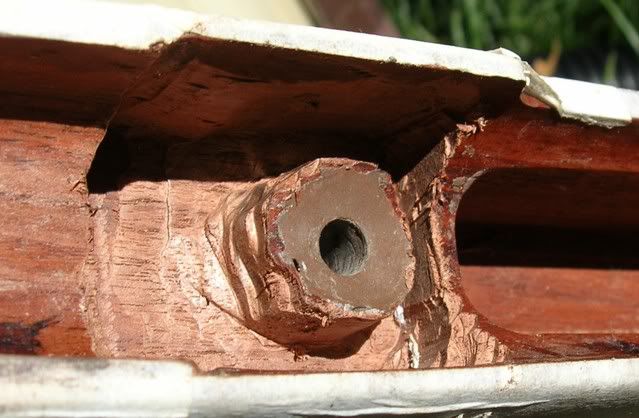
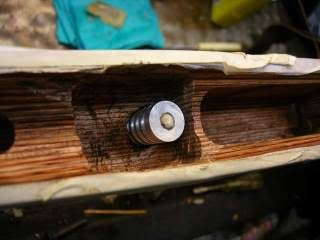
Thanks for the pics of your bedding job. However, i do have a question: When making the cast epoxy pillars, did you drill out the original stock screw hole, fill in the hole with epoxy, and then inserted a waxed action screw into the mixture, stall stock on the action & gently tightened the action screws. After the epoxy hardened, removed the action screws and did a little cleanup ????? So the hole through the cast pillar was made by the action screw and not a section of tubing ????
If i am correct with my assumption, all i can say is----wow !!!!
Thanks !!!!!!!!
Thanks for the pics of your bedding job. However, i do have a question: When making the cast epoxy pillars, did you drill out the original stock screw hole, fill in the hole with epoxy, and then inserted a waxed action screw into the mixture, stall stock on the action & gently tightened the action screws. After the epoxy hardened, removed the action screws and did a little cleanup ????? So the hole through the cast pillar was made by the action screw and not a section of tubing ????
Basically correct. I must have left some wood under the front screw escutcheon, I don’t remember how I did that. Could have used two drills, one almost the escutcheon size, one a lot bigger. Bigger hole on top.
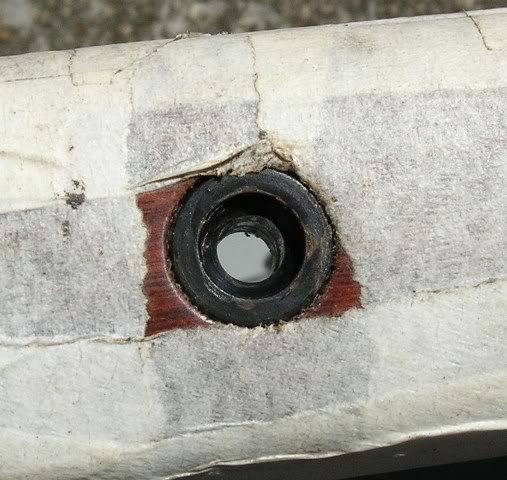
I removed the raised area in the forend so the barrel would be free floating and not put any torque on the action as the pillars were curing. I did this before drilling and casting pillars.

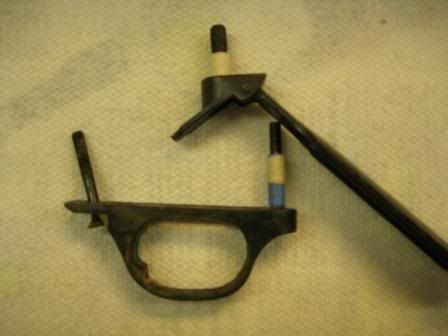
I put tape around the screws and liberally coated them with Johnson paste wax. As shown in these Ruger M77 action screws.
While the epoxy is still drillable, I will ran a drill bit through to clean up the channel and remove any interference between the pillar and the screw.
After the pillars were cast I used my Dremel tool and just routed out a bunch of wood. The strength and stiffness comes from the epoxy compound.
I used Bisonite because I have a bunch. The stuff pours well. I have cast pillars from Tex Marine a much thicker epoxy.
Thanks mr. Slamfire
Thanks for the reply to my question & for sharing your technique with the readers of this forum. I will apply your method to a stock that is not easily configured for the installation of my usual cut & fit ss tubing pillars. Keep them in the 10-ring !!!
Sincerely,
guru1911
Thanks for the reply to my question & for sharing your technique with the readers of this forum. I will apply your method to a stock that is not easily configured for the installation of my usual cut & fit ss tubing pillars. Keep them in the 10-ring !!!
Sincerely,
guru1911
If you are bedding a Ruger, maybe my experience can give you some ideas on how to procede.
Bedding a Ruger with that awful angled front action screw was much more difficult and involved than any Mauser, M70 I have ever done.
That Angled front action screw did nothing to keep the action from sliding around in the awful factory bedding.
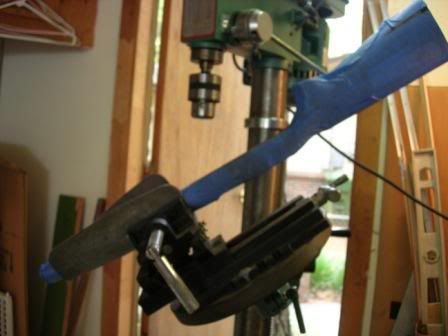
Drilling the hole was a pain as I had to spend too much time getting the correct angle.
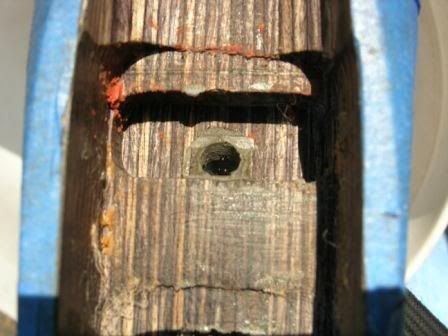
Here I have a column of Grey Brownell's steel bed in the front action screw hole. Notice just how sloppy the front recoil inletting. This is factory bedding.
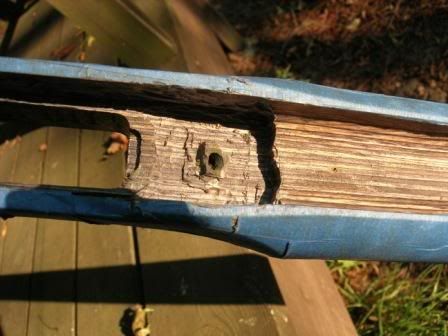
I pillar bedded the front and back screw holes and routed out a lot of wood. Here is what is left of the wood around the column of glue in the front screw hole.
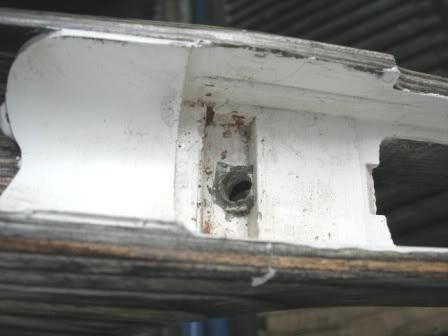
Because this was a science experiment, I wanted to see how this "pillar" bedding worked. The white is Tex Marine two part epoxy and the gray is the Brownell's steel bed for the front screw pillar.
I see no advantage to the angled fore end screw other than advertising, and it is just a pain to work around when bedding the action.
The rifle just shot great when done. Now I wish the bedding job did not look like peanut butter spread all over, but I can live with it fot the time being. When the barrel gets shot out, I am going to look around for a stock with a much higher comb, and pay someone to bed it.
And since that work won't be free , it better look more professional than what I did.
Bedding a Ruger with that awful angled front action screw was much more difficult and involved than any Mauser, M70 I have ever done.
That Angled front action screw did nothing to keep the action from sliding around in the awful factory bedding.
Drilling the hole was a pain as I had to spend too much time getting the correct angle.

Here I have a column of Grey Brownell's steel bed in the front action screw hole. Notice just how sloppy the front recoil inletting. This is factory bedding.

I pillar bedded the front and back screw holes and routed out a lot of wood. Here is what is left of the wood around the column of glue in the front screw hole.

Because this was a science experiment, I wanted to see how this "pillar" bedding worked. The white is Tex Marine two part epoxy and the gray is the Brownell's steel bed for the front screw pillar.

I see no advantage to the angled fore end screw other than advertising, and it is just a pain to work around when bedding the action.
The rifle just shot great when done. Now I wish the bedding job did not look like peanut butter spread all over, but I can live with it fot the time being. When the barrel gets shot out, I am going to look around for a stock with a much higher comb, and pay someone to bed it.
And since that work won't be free , it better look more professional than what I did.
SLAMFIRE:
Thanks for sending the pics of the ruger m77 stock. Just so happens in about another month, i will be doing the same thing to my ruger rifle----wow----talk about the timing !!!!!
Totally agree with your regarding your comments on the angled front action screw hole---hate it !!!!
Much thanks again for the great pics----guru1911
Holy cow! You really relieved that stock! Epoxy bedding should be just a thin layer over the stock material.
The angled front screw of Ruger actions is designed to pull the barreled action tightly into the recoil shoulder. The angled action screw works well, but the "generous" bedding relief provided by the factory inletting often complicates things by allowing the action to move sideways in the bedding channel, so you want to add some resin to the chamber area of the stock.. The other thing you want to do for a Ruger is to properly bed the rear of the action.
When you bed a rifle, you want to make sure you add clearance to the front, sides, and bottom of the recoil lug. This will ensure the action does not bind in the bedding and that the front guard screw can actually tighten the recoil lug against the recoil shoulder. You also want to make sure there is enough thread in the action so the action screw can tighten and not bottom out in the threaded hole.
Good luck with your Ruger build!
Bedding clearance
Thanks scorch for the reminder regarding metal to bedding clearance. I typically use bedding tape that is .007" thick in all non-critical areas, to avoid any "stress-full" bedding issues. Totally agree with you concerning the taping of the front, sides, & bottom of the recoil lug on ruger m-77 receivers.
On top of the bedding tape, i apply a thin coat of johnson's paste wax or mother's / meguire's clear coat pure carnuba wax as a release agent & let it dry. Have had really good results using these, but have seen several other readers recommend the "kiwi neutral shoe polish" in the same manner.
Whatever works for you, keep using it !!!!!! Thanks again.
Guru1911
I don’t remember the sizes. They were big. Could have been a spade. I have 1/2 and 3/8 spade drill bits. Could have been what I used. I wanted a thick pillar column.What size & type of drill bit did you use to drill out the action screw holes, before casting the pillars ???? My guess is the bit was either a "spade" tip, "forester", or an aircraft "counterbore" style.
Thin? Why do I want thin? I want thick. Like hamburgers and steak, thicker is better for bedding. Epoxy material is much stronger and stiffer than wood. I wanted the stiffest, strongest bedding I could get. I was looking for at least ¼” to 3/8” thick epoxy layer.Holy cow! You really relieved that stock! Epoxy bedding should be just a thin layer over the stock material.
And I did bed the rear tang, and I routed out one heck of a lot of wood around the tang area. Lots of bedding material keeping that action flat.
I totally agree, slamfire !!!!!
Totally agree with you on the idea of having the bedding thick !!!
I typically bed a b/a stock with the tip of the forearm at approximately .125" thick & tapering toward the rear of the barrel channel at .500" thick. Along the sides of the receiver area, the bedding will be from .125" to .190" thick.
Under the front of the receiver & through the full length of the barrel channel i will remove about .125" of the bottom & sides. Then i will drill small holes in the bottom & along the sides of the channel for the bedding compound to seep into the stock, acting like "roots" which really adds strength to the forearm, increases the bedding surface area, & absolutely prevents any warping, swelling, or shrinking of the wood. The thickness of the bedding compound also helps to dampen any vibrations which occur during normal firing.
Guru1911
Last edited:
SLAMFIRE:
Looked at the photos that you had originally sent to this forum, as to the size bits you used. I said to myself "i bet those holes were either 1/2" (.500") or 3/4" (.750") & you confirmed my guess.
Btw: When working with bedding compounds & the materials seem a little stiff to mix, take the resin & hardner outside and set the containers in the sunshine for about 15 minutes to warm up. Better yet, set them on a black cast iron skillet or on top of your propane tank. The heat from the sun gets really absorbed by the steel & is then transferred to the compound container. Will make things easier to mix.
Guru1911
Epoxy bedding tip
Before installing the barreled receiver back into the stock for the final time, use cotton swabs & thinly "paint" the molded epoxy inside of the stock with johnson's paste wax. Let dry & then buff with clean swabs & terry cloth towels.
Will add a nice shine to the bedded area & will permit the barreled action to slip in & out of the stock very easily.
Another "shop tip" from guru1911 to the readers of this forum.
Thanks to all who contributed
TO ALL WHO CONTRIBUTED TO THIS THREAD: THANK YOU FOR PARTICIPATING, THE EXCELLENT PICS, & A POSITIVE RECEPTION FROM THE READERS.
SEVERAL CONTRIBUTORS REALLY WENT OVER-THE-TOP TO MAKE THIS THREAD A BIG TIME SUCCESS IN MY OPINION. EVEN THOUGH I HAVE BEEN BEDDING B/A RIFLES FOR ALMOST 3 DECADES, I LEARNED SOMETHING NEW FROM FELLOW STOCK BEDDERS. THE AMOUNT OF HIGH-QUALITY TALENT WHICH EXISTS ON "THE FIRING LINE" JUST BLOWS ME AWAY (pardon the expression)!!!!!
STAFF MODERATORS: I SINCERELY HOPE YOU ARE PLEASED WITH THOSE WHO ARE MEMBERS OF THIS FORUM, AS WE REGULAR CONTRIBUTORS TRY VERY HARD TO SAY & DO THE RIGHT THINGS TO HELP OUR FELLOW SHOOTERS & TO ADVANCE THE SHOOTING SPORTS FOR ALL PARTICIPANTS.
GURU1911 (official forum cheerleader)----GO TEAM !!!!!


