Mosin-Marauder
New member
Greetings!
Before I get started, I would like to make it perfectly clear that this is my first step into gunsmithing (if you'd even call it that.). So if anyone disagrees or has any suggestions on or for anything I've done in this, please don't hesitate to comment, constructive criticism is good!
This is devoted to anyone who is not satisfied with the accuracy of your rifle and how to improve it. Now let's get started.
First off, the materials you need are:
-Adhesively backed cork
-a straight edge or ruler
-X-ACTO knife or knife
- Large Flathead Screwdriver
-Scissors
-150 Grit and 400 grit sandpaper or any coarse and smooth sandpaper
-a lug or ratchet socket
-air compressor or your mouth for sawdust
-A steady hand
Step 1: Disassembly. (This is best done in a gun vise)
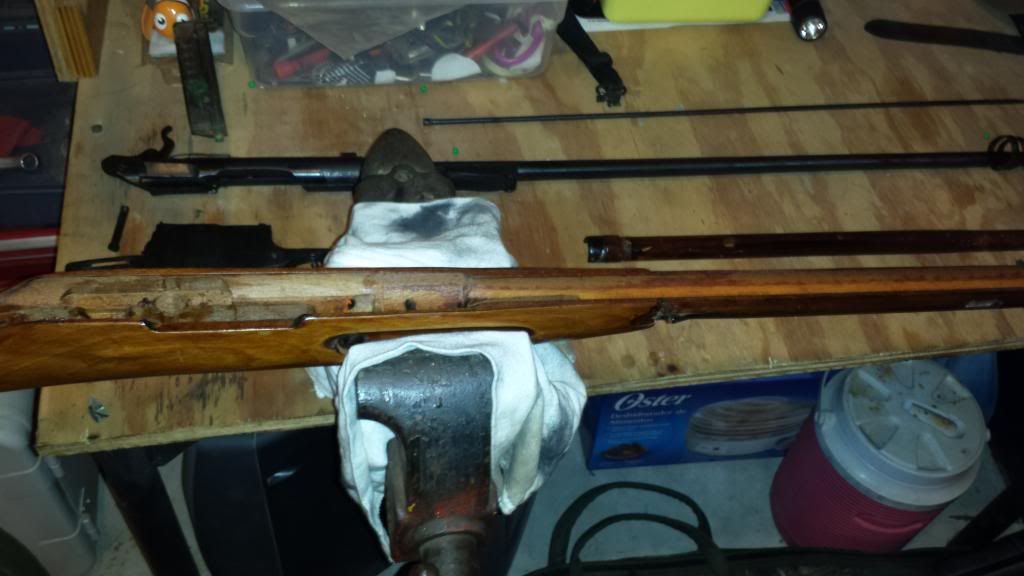
To disassemble your 91/30 for this technique, first, take out the bolt. Next, unscrew the tang screw where the metal meets the wood on your butt stock (near where the bolt comes out). Then, clamp your front sight in the vise, and unscrew your recoil bolt (at the front of the magazine). Un-clamp the sights but be careful when you do, as you now have a loose barrel. Then, clamp the wood of your stock into the vise and and remove the cleaning rod. Then slide the barrel bands off (removing the front sight is not necessary, they will rest against it ) now remove the upper handguard. It should look something like this when you're done.

Step 2: Sanding.
Using your 150 grit sandpaper or your coarse sandpaper, sand the barrel channel, utilizing the lug or socket as leverage, to minimize or get rid of any imperfections and uneven pressure points on the barrel. Lastly, after you are satisfied with the quality of the barrel channel, sand it with the 400 grit or smooth sandpaper to smooth it out. (Don't forget to blow out the sawdust!) Also, please try not to force the sandpaper or socket or sand too much, as it could split the stock.
Step 3: Bedding
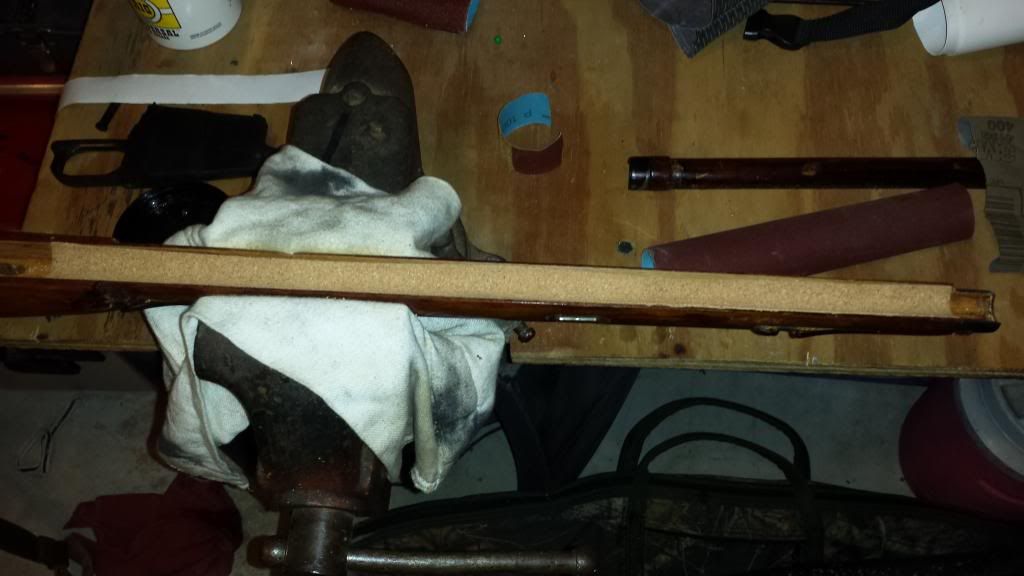
Taking your straight edge and a pen or pencil, mark 1 inch marks on each side of your roll of cork. Take your X-ACTO knife , knife, or scissors to cut the inch wide strip from the roll of cork. Take the adhesive cover off the cork, then place one end near the metal end where the barrel exits the stock, then place the other near the small groove in the stock near the recoil lug, continue to press down the cork so that it fits securely in the barrel, trim any excess with a knife or scissors. Make sure there are no open spots under the cork. Make sure the cork strip isn't too long so the barrel bands can easily refitted. It should look like this.

Step 4: Shimming.
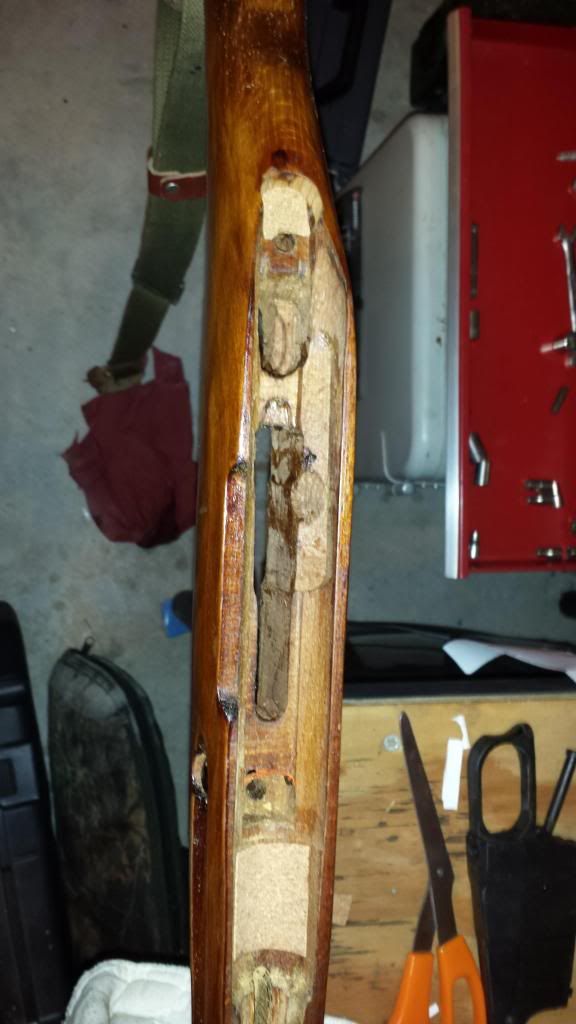
As far as shimming goes, I didn't do much. I placed an inch wide strip about 1.5 inches long over top of the recoil lug. Then, place one piece of cork over where the tang screw goes, making sure it doesn't cover up the hole.( I didn't get the measurements for this piece, as it's shape is a bit irregular). It should look something like this.

Step 5: Reassembly.
To reassemble the Rifle, pretty much just put everything back in this order. Top Handguard, Barrel bands, magazine and recoil bolt, tang screw, bolt, cleaning rod.
You're done!
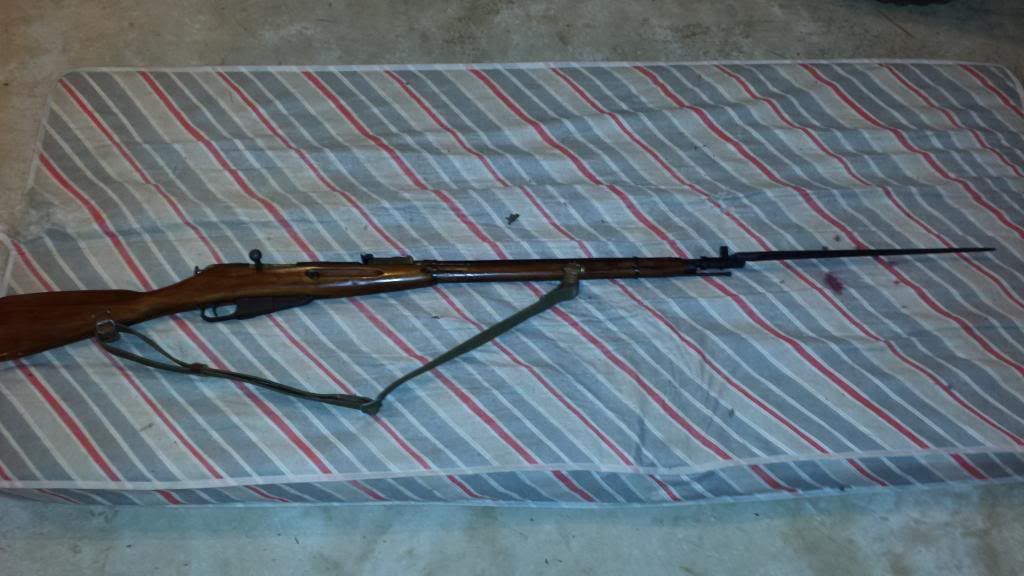
Now, I hope you've all enjoyed this article and I hope it helps improve your rifle. Thank you for reading. And here's my finished product.

Before I get started, I would like to make it perfectly clear that this is my first step into gunsmithing (if you'd even call it that.). So if anyone disagrees or has any suggestions on or for anything I've done in this, please don't hesitate to comment, constructive criticism is good!
This is devoted to anyone who is not satisfied with the accuracy of your rifle and how to improve it. Now let's get started.
First off, the materials you need are:
-Adhesively backed cork
-a straight edge or ruler
-X-ACTO knife or knife
- Large Flathead Screwdriver
-Scissors
-150 Grit and 400 grit sandpaper or any coarse and smooth sandpaper
-a lug or ratchet socket
-air compressor or your mouth for sawdust
-A steady hand
Step 1: Disassembly. (This is best done in a gun vise)
To disassemble your 91/30 for this technique, first, take out the bolt. Next, unscrew the tang screw where the metal meets the wood on your butt stock (near where the bolt comes out). Then, clamp your front sight in the vise, and unscrew your recoil bolt (at the front of the magazine). Un-clamp the sights but be careful when you do, as you now have a loose barrel. Then, clamp the wood of your stock into the vise and and remove the cleaning rod. Then slide the barrel bands off (removing the front sight is not necessary, they will rest against it ) now remove the upper handguard. It should look something like this when you're done.

Step 2: Sanding.
Using your 150 grit sandpaper or your coarse sandpaper, sand the barrel channel, utilizing the lug or socket as leverage, to minimize or get rid of any imperfections and uneven pressure points on the barrel. Lastly, after you are satisfied with the quality of the barrel channel, sand it with the 400 grit or smooth sandpaper to smooth it out. (Don't forget to blow out the sawdust!) Also, please try not to force the sandpaper or socket or sand too much, as it could split the stock.
Step 3: Bedding
Taking your straight edge and a pen or pencil, mark 1 inch marks on each side of your roll of cork. Take your X-ACTO knife , knife, or scissors to cut the inch wide strip from the roll of cork. Take the adhesive cover off the cork, then place one end near the metal end where the barrel exits the stock, then place the other near the small groove in the stock near the recoil lug, continue to press down the cork so that it fits securely in the barrel, trim any excess with a knife or scissors. Make sure there are no open spots under the cork. Make sure the cork strip isn't too long so the barrel bands can easily refitted. It should look like this.

Step 4: Shimming.
As far as shimming goes, I didn't do much. I placed an inch wide strip about 1.5 inches long over top of the recoil lug. Then, place one piece of cork over where the tang screw goes, making sure it doesn't cover up the hole.( I didn't get the measurements for this piece, as it's shape is a bit irregular). It should look something like this.

Step 5: Reassembly.
To reassemble the Rifle, pretty much just put everything back in this order. Top Handguard, Barrel bands, magazine and recoil bolt, tang screw, bolt, cleaning rod.
You're done!
Now, I hope you've all enjoyed this article and I hope it helps improve your rifle. Thank you for reading. And here's my finished product.

