Annual Gun Building Workshop

Good morning from Bowling Green KY. I'm enrolled in the National Muzzle Loading Association's annual Gun Building Workshop hosted by WKU. While technically I'm in the tool making workshop, I may spend a few days brass casting with Dr. Terry Leeper (sp).

Everyone is familiar with the Girandoni air gun that Lewis & Clark carried on their field trip/See America Tour, right? Well, I learned that the metallurgy was poor and the material was sold by the King's brother to Girandoni. Wrought iron for its air flask and internal parts made with wrought iron contributed to its failure (in the Austrian Army) and parts breakage.

You can learn so much from the students attending the seminar.
 
I used to work for a brass/bronze foundry in Northern Colorado. Actually,art casting sculpture is pretty big around here.

But that s mostly lost wax.The outfit I worked with also did high resolution,very fine sand casting. The sand was "Trade Secret" .It supposedly came from some river in Missouri. A lot of the business was replicating antique hardware.Cash registers,furnture and door hardware,etc. The could replicate old brothel tokens and the detail was very good.

I ran the furnace,loaded the crucible,watched the melt,Helped pour,cut sprues,filed,etc.
Every chance I'd get,I'd prefer silicon bronze over brass for material.

I'd put a square of common cardboard under the crucible n the furnace (gas flame off) This would turn to ash and kept the crucible from sticking.
Then I'd load the crucible with the metal f choice.
A problem with brass is the zinc catches fire and burns at casting temp.
We added a couple of beer bottles to the crucible...obviously before the metal was melted. Not a drop of moisture can go into the melt! The glass melted and put a cap on top of the brass.This kept the oxygen out,fo the zinc did not burn.
At the moment of pour,we'd pierce the molten glass with a poker for a hole to pour through.

The pour burns,smokes badly ,and is undoubtedly horrible for health.We opened the garage door,ran fans,and wore respirators.

We did get very good results.

This was maybe early 80's? I forget some things. I'm pretty sure with bronze and aluminum we did a flux/skim,but with brass,I don't think so. That glass cap was important.

I hope I told you at least one thing you did not already know.
 
Glass was mentioned in the lecture.

The instructor was the former dept. head (industrial engineering?) at WKU.

A lot of people casted buttplates & triggerguards today. I spent the day filing a patchbox jig and then making (unfinished) forearm molding tool.
 
Are they using an electronic melting pot?

A friend of mine had an electronic one.
It wasn't very large but it was expensive.
It had an electronic heat control and a carbon fiber type crucible.
All electric I think, possibly intended for medical casting.
He said that using it could control the melting temperature to nearly an exact degree, but it just couldn't hold a whole lot of metal.
Maybe about a quart more or less.
He said that his melting pot could get hot enough to at least melt bronze but I don't know if he ever did.
 
Last edited:
Ours was a propane/air blast. I'd say our crucible was more than one gallon probably less than two. A gallon is heavy. We had a two man arrangement to lift and pour the crucible.
 
Propane. It is a one man job to lift the crucible out and then a two man job to pour. I now have a rough casting of a trigger guard and buttplate.
 
Today I finished a mandrel for forming an entry pipe/thimble as well as a forearm molding tool. The latter required much more work than the former.
 
Will do. Two different people have taken pictures for me. I have to wait for them to email them to me so that I may post pictures.
 
Today we hardened and tempered our mandrels for making pipes and entry pipes.

Our instructor also demonstrated how to make a patchbox. He's much quicker than I am but then again, he's been doing it for forty years. He also demonstrated how to form a brass nosepiece out of .050 sheet brass.

Started on a marker scribe today.
 
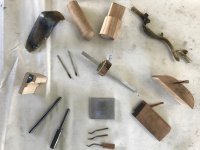
Other things made include:

18th Century sanding block
Die for rounding plate brass into a pistol grip cap.
Forearm molding scraper
 
Outercircle going clockwise:

forearm scraping/moulding tool. The half circle fits into the ramrod groove
brass buttplate casted during the casting portion of the class
Wood die and form - used to stamp flat sheet brass into round shape (to make curved grip caps)
brass trigger guard casted in class
sanding block - not something anticipated but since there was scrap wood and time, why not?
tracing tool (pencil not showing throw in image)
three relief carving tools. One has handle. One is skewed left, one right and the other is circular for flattening the surface
mandrels (fat one is form forming entry pipe/thimble - can do both faceted and round. thin one is for pipes/thimbles).

Inner circle:
Two silver wire inlay tools (made of tool steel
marking gauge (most labor intensive tool I made. The tool I didn't make was a bow saw or ramrod channel plane).
Hinge forming jig for patchboxes.

index.php

https://thehighroad.org/index.php?attachments/tools-jpg.845928/

OK, I can't post the pic but could only post a link to it (from THR).
 
Thank you Tidewater Kid!

Because I sent it sideways (not that it matters), here are the tools from clockwise:

Die & form (both wood) for bending sheet brass into a pistol grip.
brass trigger guard
sanding block (fun, short project just because I had time and scrap wood)
Tracing marker
Hinge patch box forming jig (top object at 6 o'clock, 2 x 2 square metal)
Three relief carving tools (one has handle)
Mandrels for forming pipes/thimbles. right one is for entry pipe and can do both round and octagon shape. One on left is just for regular pipe/thimble
Forearm scraping tool (had cutters on the side and the round part fits the ramrod channel as a guide)
cast brass buttplate

Center: left to right
silver wire inlaying tools
marking scribe

Not shown are the mortise chisel and loop saw - both were made from worn needle files.

The mandrels were heated red (as were the mortise chisel and loop saws) and then immersed into kerosene. Sorry but I never asked why Kerosene and not water. The smaller relief carving chisels were stuffed into a can of ash. Afterwards they were all polished and then tempered (the big mandrels in a nitreblue solution) and the smaller parts by an alcohol lamp that was blown with a copper jewelers' pipe.

18th Century technology is awesome!
 
Back
Top